Getting a Foot in the Door of Game Design

First of all – sorry about the misleading title – this post is about getting the doors working in the Endless Elevator game that we are currently developing. I thought it was a good pun and that as this post is all about our development process that it wasn’t too bad. The only career advice I got is just to start making games…any games.

You’d think making a door that opens and closes would be a pretty simple thing to do but surprisingly it wasn’t.

I designed and built some 3D models of building components in MagicaVoxel and exported them as .obj files. I use MagicaVoxel because it’s free and really quick and simple to use. When I model components I can be sure that they are all exactly the same scale and that all the different bits (no matter when I made them) are going to fit together without any hassle. But the models are not optimised for game engines as they have a reasonably high poly count due to the modelling process within the program. Most of the models come out with heaps of unnecessary triangles that need to be managed first. In most cases I will import the object into Blender and use the “decimate” modifier on the planes (with an angle of about 20 if you are interested). In the case of the door object it was pretty simple, it is just a door after all, and I didn’t need to optimise it.

Here is what the door looks like in MagicaVoxel:
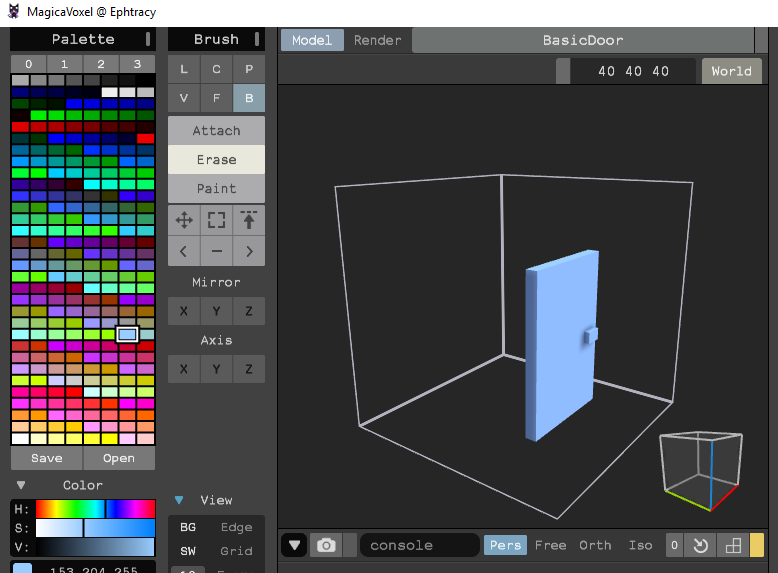
Notice that the door object is sitting just forward of the enclosing frame and that when exporting the object the center is at the middle bottom plane of that frame. The door is off center because it’s modelled to fit exactly in a doorway that sits exactly in that position within the frame. This saves me a huge amount of time lining everything up when it gets to Unity as the position of the door (or any other object for that matter) is already in the right spot. The problem is that the point of origin for the door is in the wrong spot. It exports a few units behind the door and on the floor! This becomes important when you try and rotate that object (like you would when opening and closing a door) and the pivot point is not where the hinges should be.

To fix this I had to import the .obj file into Blender and reposition the point of origin for the model.

This is what it looks like in Blender when I did this:
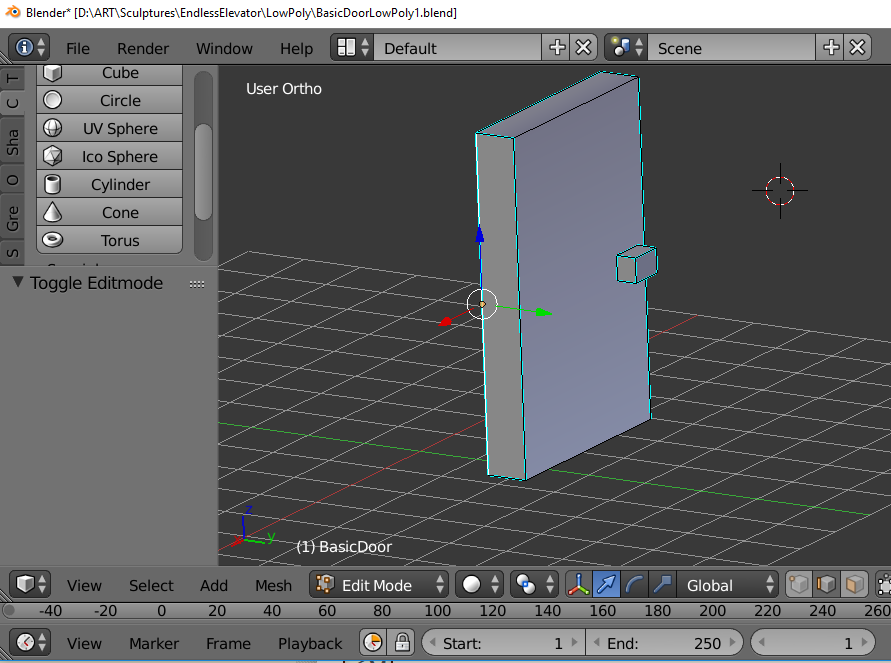
To do it I selected the edge that I wanted the door to pivot on when opened.

Then in Edit Mode:
Mesh -> Snap -> Curser to Selected

In Object Mode:
Object -> Transform -> Origin to 3D Curser

So that puts the curser onto the correct position in the middle of that edge where the hinges would be and resets the point of origin (which is where it will pivot when rotated in Unity) to the right spot.

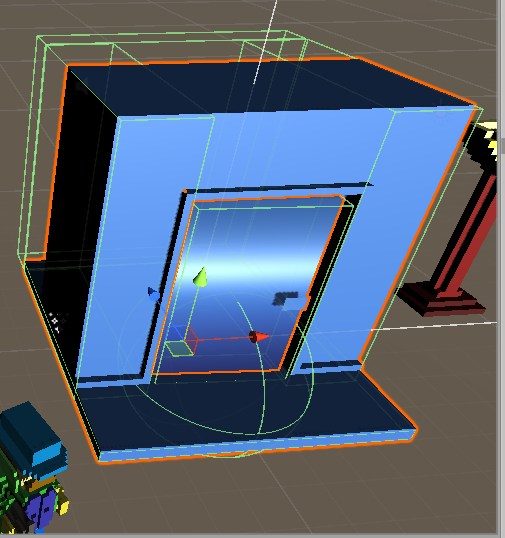
Once we were all imported into Unity and looking good I set up a prefab for the “Doorway” object with the door as a child object. The doorway object has a bunch of colliders to stop the player walking through the walls and a big sphere collider where the door would be to trigger the open / close function when the player walks into it.

This is what the doorway looks like in Unity:
Next I scripted up a few options for opening the door. I’ll post the script at the end of this article but basically there were three options of opening the door that I wanted to test. (Actually I tried it about six ways but whittled it down to the most simple methods – and just as an aside there is an actual “hinge” object type in Unity if you ever need it).

This is how the script looks in the editor:
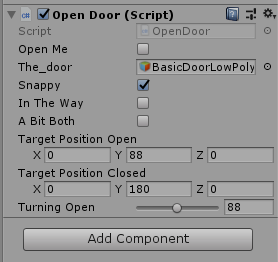
Notice the slider at the bottom to control how far I want the door to open. It’s really handy to have this when playing in the editor and getting your settings right. If you want to know more about using it see this post

The three tick boxes are for testing the three different ways of opening the door.

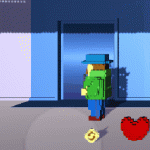
Snappy was a quick simple transform of the position from open to closed with no “in betweening”. It looks a bit unnatural as the door magically goes from closed to open but it’s not too bad and most people are pretty used to similar behaviour in video games.

The active line in the code is:
the_door.transform.Rotate(-Vector3.up * 90 * Time.deltaTime);

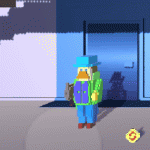
The next method works more like a door should. In that it swings open and closed the whole way in a steady fashion. But the big problem with this method was that it was OK when the character was going into the doorway and with the swing of the door but when it was time to come back out of the doorway the door was in the way. There was not enough room to trigger the door opening from the other side without being hit by the door as it opened. Plus if the player enters the collider from the wrong trajectory the character gets pushed through a wall by the swinging door which is sub-optimal. I called this method InTheWay!

The active line here is:
the_door.transform.rotation = Quaternion.Euler(targetPositionOpen);

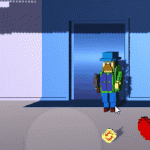
In an effort to combat this I chose to do a hybrid method that opened the door to a point that wouldn’t hit the player and then do the magic transform to get all the way open. I call this one aBitBoth. It looks a little weird too. Like there is an angry fairy pulling the door closed with a snap after the character enters.

Here are all three to compare.

Snappy
In The Way
A Bit of Both
I’m not too sure which one I’m going to use at this stage as the Snappy method works best for now but I like the In The Way method better. I looks more normal and I like that you have to wait just a few milliseconds for the door to swing (adds tension when you are in a hurry to escape a bullet in the back). I could do something like halt the player movement from the rear of the door when it triggers to open from the closed side or maybe play around with the radius of the sphere. Neither solutions seem like great ideas to me right now but something like that will need to be done if I’m going to use that method. Maybe I could just have the door swing both ways and open to the outside when he is behind it but that’s probably a bit weird for a hotel door.

Here is that script that I was testing with:

using UnityEngine;

public class OpenDoor : MonoBehaviour {

    public bool openMe;
    public GameObject the_door;
    public bool snappy;
    public bool inTheWay;
    public bool aBitBoth;
    public Vector3 targetPositionOpen;
    public Vector3 targetPositionClosed;

    [Range(0F, 180F)]
    public float turningOpen;

    void Start ()
    {
        targetPositionClosed = new Vector3(0f, 180f, 0f);
        targetPositionOpen = new Vector3(0f, turningOpen, 0f);
    }

    void Update()
    {

        if (openMe)
        {
            OpenMe();
        }
        else
        {
            CloseMe();
        }

    }

    private void OpenMe()
    {

        if (inTheWay)
        {
            if (the_door.transform.rotation.eulerAngles.y > turningOpen)
            {
                the_door.transform.Rotate(-Vector3.up * 90 * Time.deltaTime);
            }
        }

        if (snappy)
        {
            the_door.transform.rotation = Quaternion.Euler(targetPositionOpen);
        }

        if (aBitBoth)
        {
            if (the_door.transform.rotation.eulerAngles.y > turningOpen)  // 144f
            {
                the_door.transform.Rotate(-Vector3.up * 90 * Time.deltaTime);
            }
            else
            {
                the_door.transform.rotation = Quaternion.Euler(targetPositionOpen);
            }

        }

    }

    private void CloseMe()
    {
        if (inTheWay)
        {
            if (the_door.transform.rotation.eulerAngles.y <= 180)
            {
                the_door.transform.Rotate(Vector3.up * 90 * Time.deltaTime);
            }
        }

        if (snappy)
        {
            the_door.transform.rotation = Quaternion.Euler(targetPositionClosed);
        }

        if (aBitBoth)
        {
            if (the_door.transform.rotation.eulerAngles.y <= turningOpen)  // 144f
            {
                the_door.transform.Rotate(Vector3.up * 90 * Time.deltaTime);
            }
            else
            {
                the_door.transform.rotation = Quaternion.Euler(targetPositionClosed);
            }
        }
    }

        void OnTriggerEnter(Collider col)
    {
        string colName = col.gameObject.name;
        Debug.Log("Triggered OpenDoor!!! : " + colName);

        if (col.gameObject.name == "chr_spy2Paintedv2" || col.gameObject.name == "BadSpy_Package(Clone)") 
        {
            openMe = true;
        }
    }

    void OnTriggerExit(Collider col)
    {
        if (col.gameObject.name == "chr_spy2Paintedv2" || col.gameObject.name == "BadSpy_Package(Clone)") 
        {
            openMe = false;
        }
    }

}

Why Normalize()

I’ve been doing some work on the AI for enemy behaviours for an unreleased game Endless Elevator and have been delving into the book “Unity 2018 Artificial Intelligence Cookbook – Second Edition” by Jorge Palacios.

It uses the Normalize() function regularly to record the direction of an object in relation to another object and it got me thinking about the usefulness of this function.  You can see why something like knowing the direction of the Player could be good for an enemy AI behaviour but I wanted to investigate more deeply about how this worked and how I could use it.

One of the things I hadn’t consciously been aware of, but is obvious once you point it out, is that a Vector3 can define a location (ie. a point in space 0, 0, 0) but it can also define a direction if you have a starting position and a target position.

A good example of a Vector being used to denote a location and a direction in Unity is the Ray.
The Ray consists of two Vector3 data points. The first Vector3 is the source position the ray is taken from and the second Vector3 is the direction of the target.

When a direction Vector3 is Normalized it keeps it’s direction but it’s length (how far away one object is from another) is set to a point between 0 and 1.  In Unity they round down to 0 if the objects are very close to each other (anything under about 0.04f of a unit) anything above that gets Normalized up to 1.

As an example we can simplify a bit by limiting ourselves to a Vector2.

A Vector2 can also be either a point or a direction depending on what you want to use it for.
If it’s (3, 0) then it could be either a point at x=3, y=0, or a direction along the x axis (one dimension) with a length of 3 and a slope of 0.
If you Normalize() that example the Vector2 becomes (1, 0). It will have a length of 1 but still be pointing in the x direction.
If you add the y value (dimension) into the picture where x=3, y=3 the Normalized value becomes (0.7, 0.7). So without going into the maths of why … you can see that the axis/dimensions impact on each other to define the Normalized direction.

We can extrapolate this into three dimensions without too much difficulty but I’m not going to describe that here as it’s not that necessary to understand. We only need to grasp what this means and what sort of use you can make of it in a Unity project.

For Example…

This is a simple use case of why you might want to use Normalize().

(Note that there is also a Normalized() function where the current vector is left unchanged and a new normalized vector is returned).

I’ve created an example project where the relationship between two objects (a Cube and a Sphere) will give us a direction (using Normalize()).  The direction is applied to a transform.Translate function on a third object (a Cylinder) which now moves in the given direction.

In this script below attached to our Green Cube (the unchanging point of origin – 0, 0, 0) we define the Pink Sphere as the target.  In the script we get the difference between the position of the sphere and the Cube and Normalize() it to make a direction. It doesn’t matter how far the Sphere is from the Cube the direction stays the same.

Also to extend the example I’ve added a Ray with the same origin as the Cube (0, 0, 0) that will always point to the Sphere.  This shows that the Normalized Vector3 is the same as the direction of the Ray pointing to the Sphere.

Normalizing Direction

The public Vector3 lineDirection is the difference between the position of the Cube and the Sphere. This is the variable we will pass to the Cylinder to move it in the required direction.

using UnityEngine;
using UnityEngine.UI;

public class HowToNormalizeDirection : MonoBehaviour {

    public Vector3 lineDirection; 
    public GameObject target;   
    public Text vector_text;
    public Text norm_text;
    public Text ray_direction;
    public Ray whatsTheRay;    

    // Use this for initialization
    void Start () {
        lineDirection = new Vector3();
        whatsTheRay = new Ray();
	}
	
	// Update is called once per frame
	void Update () {
        lineDirection = target.transform.position - transform.position;  
        vector_text.text = "Vector3 target.transform.position :" + lineDirection;
        lineDirection.Normalize();  
        norm_text.text = "Vector3 Normalized() :" + lineDirection;
        whatsTheRay = new Ray(transform.position, target.transform.position);
        ray_direction.text = "Ray : " + whatsTheRay.ToString();   
    }
}

Moving the Capsule in the Same Direction

In this script below attached to the Cylinder we get the direction from the lineDirection variable above but we could also have used the inbuilt Ray.direction function to return the same result.

using UnityEngine;

public class MoveCapsule : MonoBehaviour {

    public Vector3 direction;
    public float speed;
    // Use this for initialization
    void Start () {
        direction = Vector3.zero;
        speed = 0.50f;
	}
	
	// Update is called once per frame
	void Update () {
        var script = GameObject.FindWithTag("Cube").GetComponent();   
        direction = script.lineDirection;
        //direction = script.whatsTheRay.direction;  
        transform.Translate(direction * speed * Time.deltaTime); 
	}
} 

In the Video below you can see this demonstrated. The position of the Pink Sphere is being manually manipulated using the Transform on the right. The text areas expose the vector3 values being accessed by the objects and scripts.

So what’s going on in this video amateur hour?

The three lines of text at the top of the game scene represent:

1. The Vector3 Position of the Pink Sphere.

2. The Vector3 Normalized  direction which is the relationship between the position of the Green Cube (0, 0, 0) and the Pink Sphere (x, y, z).

3. The uses of Vector3 in the Ray.  First the position of the origin and then the Direction of the Ray which is exactly analogous to the Normalized Vector3 in point 2 above.

The uses for something like this could extend to a weapon aiming system, a custom controller or be passed into a path finding routine. This is not the only option of course there are other built in methods like transform.LookAt(target) available which may accomplish your programming goal.

During the research for this post I found the following links helpful.

https://docs.unity3d.com/ScriptReference/Vector3.Normalize.html
https://docs.unity3d.com/ScriptReference/Vector3-normalized.html (which is a different but related function)
https://forum.unity.com/threads/what-is-vector3-normalize.164135/
https://answers.unity.com/questions/52881/vector-normalization-question.html
https://www.dummies.com/education/math/calculus/finding-the-unit-vector-of-a-vector/ (for why you really don’t want to know about the math or do it by hand)
https://www.mathsisfun.com/algebra/vector-unit.html (best for simple vector explanation)
https://docs.unity3d.com/ScriptReference/Ray.html
https://docs.unity3d.com/ScriptReference/Ray-ctor.html

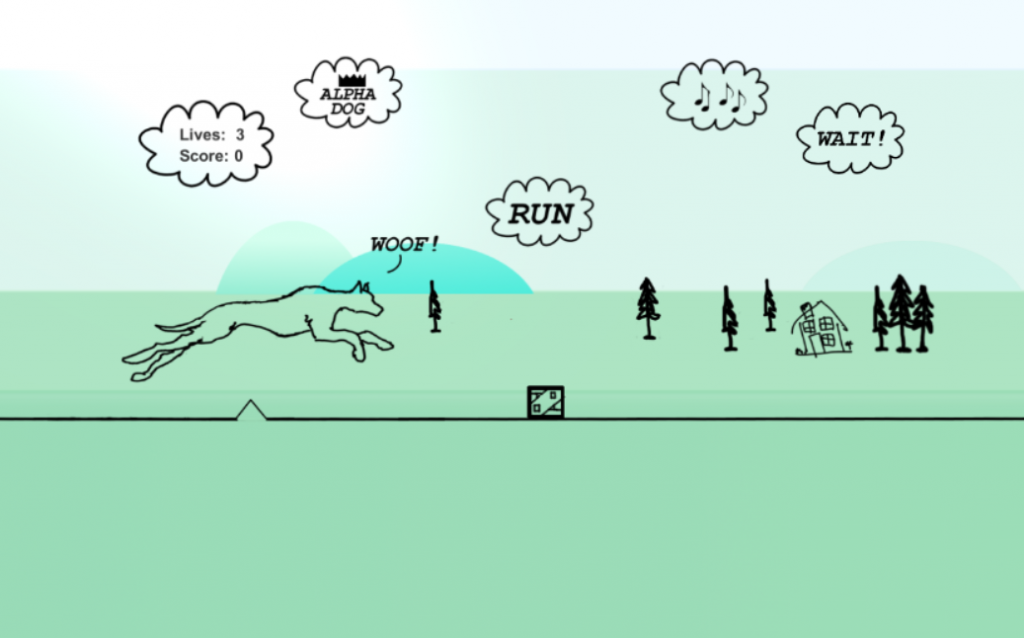
The Dog Run is in Production on the Google Play Store

This week we moved our latest game The Dog Run into Production on the Google Play Store.

The Dog Run is an Endless Runner for Android that supports animal welfare!

It’s a free game. There is the option to watch ads but instead of in game rewards all profits from the advertising goes to support animal welfare and animal hospitals.

The game is about taking your fun lovin’ pooch for a run. But watch out! There is a bunch of obstacles in your path. It’s a good thing your dog is a natural jumper and can run all day in all sorts of weather.

Read the review from Daikon Media here.

They say, “… it’s not only the style, that I like, it’s also the unique sense of humor…the game is even fun and original.”

Feedback can be posted on the Google Play Store,  on this website in the comments,  or directly by email.

ZuluOneZero Game Design

Games


zuluonezero.z10@gmail.com

Image File Size in Unity and their Impact on Start Up Time on Android

Xander here…

We have been Beta Testing our soon to be released game The Dog Run and it’s been mostly OK but we had a number of issues with memory on smaller or older devices.  We made some gains with modifying our audio files (See this post) but were still running into niggling crashes on start up and longer than normal load times.

We were getting feedback like:

“Hey, I installed the game and couldn’t run it. When I started it there was a black screen for about 15s and then it went back to the launcher. Then each time I went back to the game there was unity and game logo fading out and again the app crashed/hanged and I was sent back to the launcher.”

(Thanks slomoian and the_blanker for all your help testing)

Obviously feedback like this is a little disheartening and far from ideal.  The game was running fine on every device and emulator I had access to but it’s only when you send something into the wild that you realise the full breadth of the spectrum that is the Android platform.  I guess this is another lesson in the importance of proper Beta testing.  One we hadn’t learned last time we released an app (see this old post on the perils and difficulty of finding Beta Testers).

We were using adb logcat to monitor our start up problems but not finding a “smoking gun” that solved every case. It seemed to be a memory problem and often with the graphics cache so again we went back to the Unity Editor build log to investigate our image files.  The game uses multiple large files to ensure that our animated sprites were always in the right spot. The game is dependent on the titular Dog hitting the ground line accurately on every frame to achieve the look we wanted when he runs and the paw breaks the ground line and appears as a gap.  We used a “flip-book” old fashioned style of animation where each frame sits exactly on top of the old frame and everything lines up on a transparency like in classic animated movies.

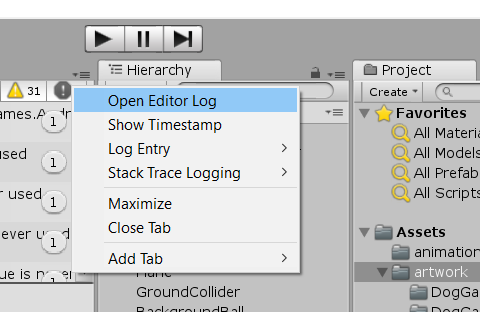
By using this schema we had to keep to a certain scale that fit within the constraints of a typical Android device format. This meant that when the images were imported the POT was not going to be something we could play with easily to get performance gains.  (Image files that have a width and breadth that is a power of 2 are faster and easier for the compression functions to work with – so 2, 4, 8, 16, 32, 64, 128, etc).  If I had the chance to do this again this is something I would probably start doing right from the beginning of development. When going through the Editor Logs we did find something interesting (get to the Editor Logs by right clicking on the arrow or tab near the Console and selecting it).

We found that some of our image files were 10 MB and a few were 2 MB.  Which was a little weird as they were all exported as layers from the same Gimp file so I must have done something in the import settings or the editor to change them.

This is a comparison of two files of the same dimensions and basically the same content but with two very different file sizes:

10.6 mb 0.8% Assets/artwork/RunOnSpot6.png

2.0 mb 0.1% Assets/artwork/DogSitHeadWag.png

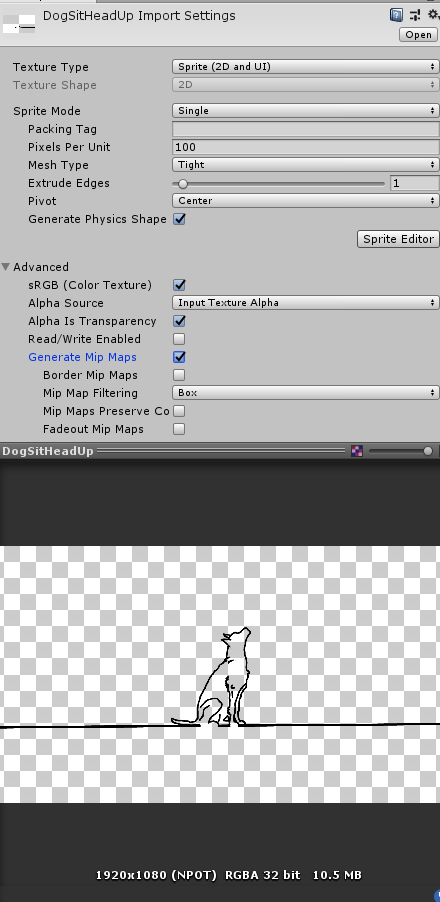
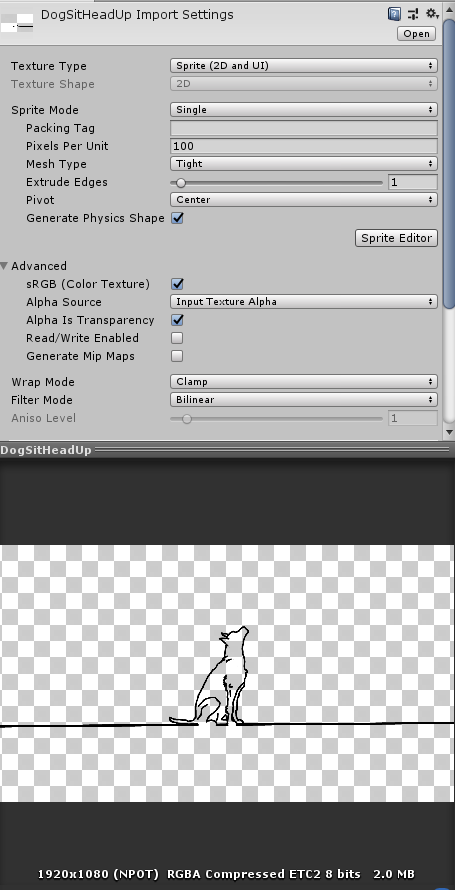
The difference that I found was MIP Maps.  I’d selected to use MIP Maps fairly early on as it made the art work look smoother in the Editor.  MIP Maps are generated in the engine to make smaller more compressed versions of your artwork that can be used at longer distances from the camera where the detail is less visible. My game is 2D and has everything running at pretty much the same distance from the screen so really MIP Maps should not be required.  My art did look a bit better in the editor with them turned on but on a smaller device like a phone I couldn’t really tell the difference.  See below the difference in a file with MIP Maps selected and a file without.

With MIP Maps turned on (see the file size at the bottom and that the type is RGBA 32 bit):

The same file with MIP Maps removed (down to 2 MB and using ECT2 compression):

This is the difference that generating those MIP Maps makes. Your file is converted from the Android default compression to a larger (harder to process) 32 bit compression format.

So by turning off MIP Maps across the three hundred plus image files in my game reduced my application start up time to under a few seconds and reduced the APK file size by over one thousand MB.

This is the Build Report from the Editor Logs that shows the larger texture sizes and final build size:

Uncompressed usage by category:
Textures 1292.3 mb 94.6%
…
Complete size 1365.9 mb 100.0%

Compare this later Build Report with MIP Maps turn off to the original one above:

Textures 284.5 mb 82.6%
…
Complete size 344.6 mb 100.0%

It’s a considerable difference with little or no quality loss on most devices.  When I say most devices there were a few cases where the running dog did look a little tatty.  On very small emulated devices (3.5″ screens and low memory) the images were being scaled down quite a lot and the results were a lot less enjoyable but still an acceptable compromise considering previously the game would not run on these devices at all.

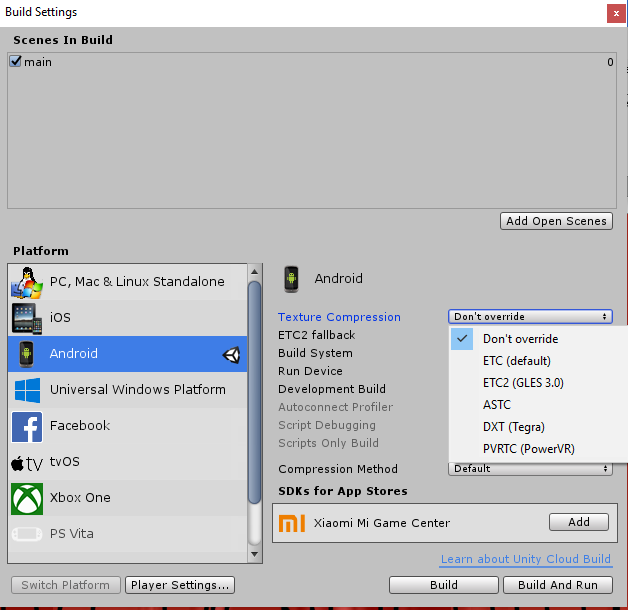
The next thing I started playing with was the different texture compression variables available for Android. I tried all of the settings (see screenshot below) in a different build and tested them against at least ten different devices with various architectures and screen dimensions and Android versions.

In each of the cases but one there was at least one test device that failed to start the game.  Once again exposing the issues of working with so many platform variables on Android.  Even when I built the APK with the (default) ETC selected one device failed the start up test.  So in the end the final build used the “Don’t override” setting which seemed to work on all devices.

Hopefully this is helpful to someone else out there and if it is try hitting the “Like” button below or sharing the link (the feedback keeps me going).

I found these references useful when troubleshooting my start up issues and learning more about compression on Android:

https://docs.unity3d.com/Manual/android-GettingStarted.html

https://docs.unity3d.com/Manual/class-TextureImporterAndroid.html

https://docs.unity3d.com/Manual/class-PlayerSettingsAndroid.html

https://answers.unity.com/questions/1406451/sprites-increase-android-apk-size.html

https://www.unity3dtips.com/unity-texture-compression-android-ios/

Using ADB Logcat to Debug Unity Application Start Up Times

Our game The Dog Run has been in open Beta testing for some time and we are wrapping up new builds after the feedback we received during the process.

There is still time if you want to check out the Beta edition of the game on the Play Store: https://play.google.com/apps/testing/com.ZuluOneZero.TheDogRun

We used the built in Unity Profiler to work on performance improvements on the running game.
https://docs.unity3d.com/Manual/Profiler.html

But when it came to the application start up we found that we had a problem. It was taking over 20 seconds for the game to open up after a user pressed the icon.
Obviously this was way too long as much of that time was spent sitting on a black screen.

Trouble was with the Debug builds of our APK’s running in the profiler it would only pick up on game play issues and we couldn’t identify what was causing the slowness on start up. So we switched to using ADB the Android Studio Debugging Bridge to see what was actually going on under the hood of Android system while our game was loading.

If you want more info on the ADB tool have a look at my previous post here.

Unity Debugging with ADB for Android

We had a handfull of APK’s that we wanted to test against on out local workstation and used APK to copy them over to our attached development device using ADB commands.
Like this:

C:\Users\<User>>adb install C:\Users\<User>\Downloads\TheDogRun_v13_debug.apk
Success

Then we ran the adb command with the logcat argument and passed that output into a file to read afterwards.
Now pumping logcat into a file generates lots of data including the buffer that was recorded before the command was run so you will get lots of info from earlier that you either need to filter out or grep through.

This is one way to filter out in adb command line but it’s not as useful as grepping through the file:
>adb.exe -d logcat -e isApplicationExternalStorageWhitelisted

It’s a pretty big log generated in just a few seconds of logging:

I preferred to have the full log in the file and use notepads and command line greps and epreps to get the info I wanted to hone in on.
On Windows I have a great Unix like tool called MobaXTerm which is really useful for this sort of work.
https://mobaxterm.mobatek.net/
It’s a Windows ssh client but includes a Cygwin type access to your local Windows file systems.

So when we were searching through the logs (and it takes a while to get used what you are looking at. I’d recommend getting on google for anything that looks interesting).

Here is an example of the log:


It changed a little bit with each run but this is the main info that I was using for to make my judgements about start up speed on.


### This is the initial call for the application
09-28 10:29:08.684 4938 4938 D StorageManagerService: getExternalStorageMountMode : final mountMode=1, uid : 10495, packageName : com.ZuluOneZero.TheDogRun

### This is the process being allocated
09-28 10:29:08.752 4938 4938 I ActivityManager: Start proc 8679:com.ZuluOneZero.TheDogRun/u0a495 for activity com.ZuluOneZero.TheDogRun/com.unity3d.player.UnityPlayerActivity

### The Window for the game is open had has focus
09-28 10:29:09.336 8679 8679 I Unity : windowFocusChanged: true
09-28 10:29:09.337 8679 8679 V InputMethodManager: Starting input: tba=android.view.inputmethod.EditorInfo@23ee73 nm : com.ZuluOneZero.TheDogRun ic=null
09-28 10:29:09.346 4938 6402 V InputMethodManagerService: windowGainedFocus : reason=WINDOW_FOCUS_GAIN client=android.os.BinderProxy@9752c36 inputContext=null missingMethods= attribute=android.view.inputmethod.EditorInfo@ea1162f nm = com.ZuluOneZero.TheDogRun controlFlags=#105 softInputMode=#20 windowFlags=#80e90500

### The Game has the Window on
09-28 10:29:09.420 4938 5124 D SamsungPhoneWindowManager: Turning screen on : com.ZuluOneZero.TheDogRun uid = 10495

### Splash Screen is coming up
09-28 10:29:09.424 4938 5124 D InputEventReceiver: channel ‘d7f15c8 Splash Screen com.ZuluOneZero.TheDogRun (client)’ ~ Disposing input event receiver.

### Splash Screen removed
09-28 10:29:09.431 3192 3192 I Layer : id=6192 onRemoved Splash Screen com.ZuluOneZero.TheDogRun#0

### This is a Debug Package but the Unity Debugger or Profiler was not attached so there is a 4-5 seconds delay while it times out waiting for the connection
48832 [Id] AndroidPlayer(samsung_SM-G930F@192.168.1.139) [Debug] 0 [PackageName] AndroidPlayer” to [225.0.0.222:54997]…
09-28 10:29:09.544 8679 8696 D Unity : Waiting for connection from host on [0.0.0.0:55070]…

09-28 10:29:14.571 8679 8696 D Unity : Timed out. Continuing without host connection.

### Scripting Engine starts up
09-28 10:29:14.682 8679 8696 D Unity : InitializeScriptEngine OK (0xe7543ee0)
09-28 10:29:14.682 8679 8696 D Unity : PlayerConnection already initialized – listening to [0.0.0.0:55070]

## Creating Open GL
09-28 10:29:14.761 8679 8696 D Unity : OPENGL LOG: Creating OpenGL ES 3.2 graphics device ; Context level <OpenGL ES 3.1 AEP> ; Context handle -1013109888

### Unity Reports it’s Unload time
09-28 10:29:22.067 8679 8696 D Unity : UnloadTime: 2.403000 ms

### Ads Start up
09-28 10:29:22.309 8679 8696 D UnityAds: com.unity3d.ads.cache.CacheDirectory.getCacheDirectory() (line:42) :: Unity Ads is using external cache directory: /storage/emulated/0/Android/data/com.ZuluOneZero.TheDogRun/cache/UnityAdsCache

### About this time the Debugging on the Application side kicks in and you start to get these sorts of messages in the log:
09-28 10:29:23.533 4938 9976 I ActivityManager: DSS on for com.ZuluOneZero.TheDogRun and scale is 1.0
09-28 10:29:23.731 8679 8696 I Unity : Building GPG services, implicitly attempts silent auth
09-28 10:29:23.731 8679 8696 I Unity : #0 0xc6578460 (libunity.so) GetStacktrace(int) 0x44
09-28 10:29:23.731 8679 8696 I Unity : #1 0xc5f5e978 (libunity.so) DebugStringToFile(DebugStringToFileData const&) 0x230
09-28 10:29:23.731 8679 8696 I Unity : #2 0xc546bf9c (libunity.so) DebugLogHandler::Internal_Log(LogType, core::basic_string<char, core::StringStorageDefault<char> >, Object*) 0xa8
09-28 10:29:23.731 8679 8696 I Unity : #3 0xc546be8c (libunity.so) DebugLogHandler_CUSTOM_Internal_Log(LogType, MonoString*, MonoObject*) 0xb4
09-28 10:29:23.731 8679 8696 I Unity :
09-28 10:29:23.731 8679 8696 I Unity : (Filename: ./Runtime/Export/Debug.bindings.h Line: 43)

09-28 10:29:24.925 8679 8850 I UnityAds: com.unity3d.ads.api.Sdk.logInfo() (line:70) :: Requesting configuration from https://publisher-config.unityads.unity3d.com/

Total start up time around 16 Seconds – we got lucky with this one.

But you know it’s system dependent so we did it another ten times for each package to make sure that the readings were comparable to our out loud counting of seconds while watching the device.

To make a long story short we started getting an idea of what happens when the app starts up.
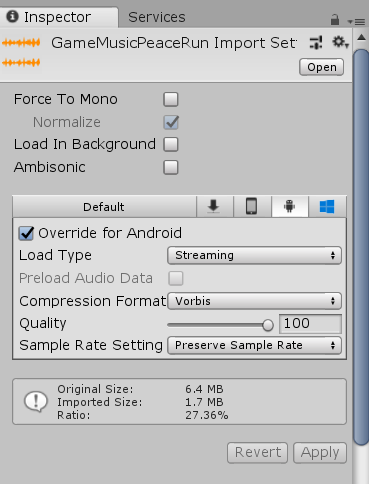
In the end the thing that most improved our startup time was the build that had changed settings to our audio files in the Unity import settings.


Basically all audio files were converted from the Unity default to the Overide for Android setting. The background music was streamed and shorter sound effects were compressed in memory.

So hopefully if you take this advice do that up front and you won’t have to spend a fun rainy Sunday debugging the start up time problem.

Interesting as it was it would have been more fun doing promo art for the upcoming release!

Key Quest! Google Play Store Key Signing and the Pain of a Long Slow Death

Should Google Manage Your Keys for Games built with Unity?

We recently had a problem that caused weeks of pain and struggle and it had nothing to do with coding. It was the damn java keystore signing process that we signed up for on the Google Play Store.

The basics are that the Google Play Store requires that all APKs be digitally signed with a certificate before they can be installed.  Apps must use the same certificate in order for users to be able to install new versions or updates.  This is a good and secure system. No issues here.

If you lose your key you cannot distribute any updates to your app/game. This would be really bad for some companies so Google offers to keep your keys safe so that you if you did lose them you can ask to have the key sent to you which gives you authority distribute again. Yay for Google!

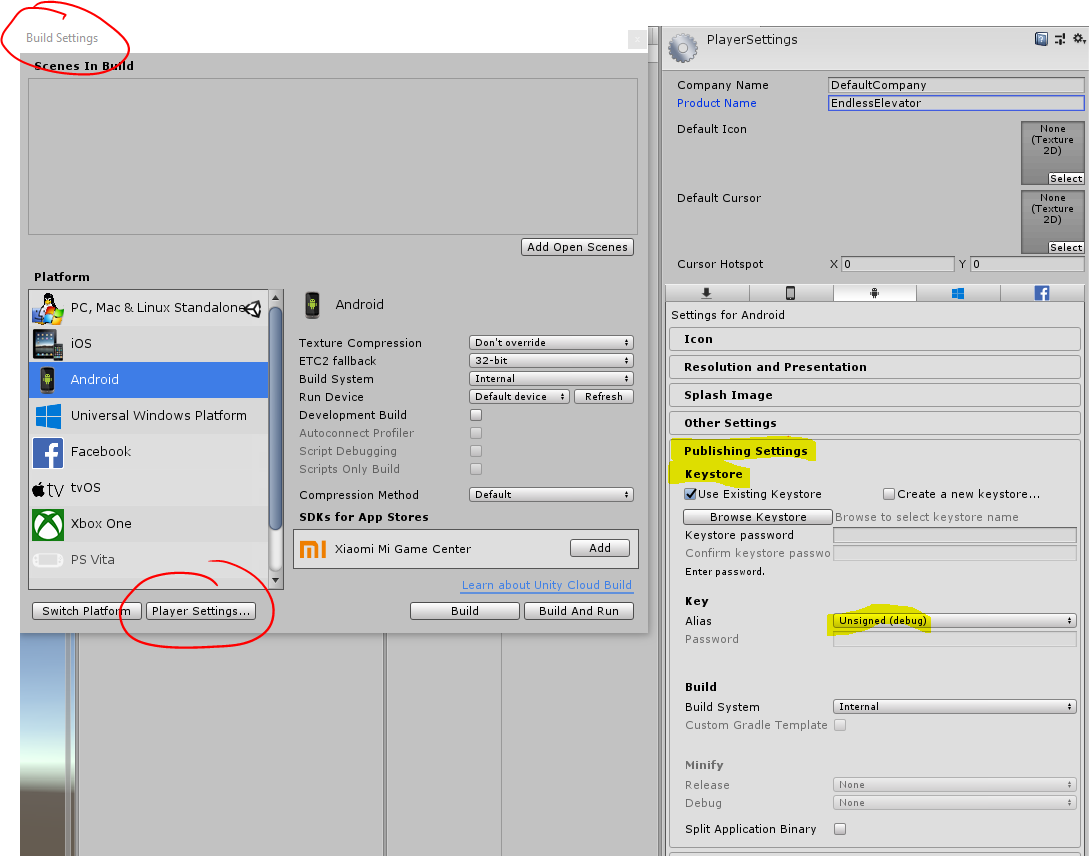
But our problems start here in Unity when you build your game for Android the keystore is defined on the Player Settings tab of the Build Setting (CTRL+SHIFT+B).

In the first case when running your project from Unity the package (APK) is automatically signed with a debug certificate generated by the Android SDK tools. The debug keystore and certificate are in $HOME/.android/debug.keystore.

This debug certificate is insecure by design and can’t be used on the Google Play Store for publishing an Alpha release but you can upload it for Beta releases.  I think this is where we started going wrong.

When you upload an APK to the Play Store you can opt in to app signing by Google Play. They recommend it but it’s optional. If you prefer, you can continue managing your own keys.

The advantages of opting in to the Google Play Store App Signing program is that 1. You ensure that the app signing key is not lost. 2. If your app signing key is compromised only a user with an account linked to your app can manage an upload key which makes it harder to do something malicious. (If you sign in your apps are signed with an upload key proving your credentials – Google then manages your APK and assigns it the correct and valid signing key).

To quote their documentation: “When using Google Play App Signing, you will use two keys: the app signing key and the upload key. Google manages and protects the app signing key for you, and you keep the upload key and use it to sign your apps for upload to the Google Play Store.

When you use Google Play App Signing, if you lose your upload key, or if it is compromised, you can contact Google to revoke your old upload key and generate a new one. Because your app signing key is secured by Google, you can continue to upload new versions of your app as updates to the original app, even if you change upload keys.

If you lose your keystore or think it may be compromised, app signing by Google Play makes it possible to request a reset to your upload key. If you’re not enrolled in app signing by Google Play and lose your keystore, you’ll need to publish a new app with a new package name.”

Alright. Read that last bit again. It’s important and why app signing might be a really good idea. If you manage your key yourself and you lose it and want to make an update to your app then you have to publish your whole app again under a different name. Again just to drum that home … If you lose your keystore, the only solution is to upload a new instance of the app to the Google Play Store with a new key, a whole new store listing like it’s a different product, as it will not accept an APK signed with a different key.

See: https://support.google.com/googleplay/android-developer/answer/7384423?hl=en
(Manage your app signing keys) The support team only accepts key reset requests from the Play Console account owner. The account owner can fill out a form and attach the upload_certificate.pem file. Then you can update your keystores and API provider registration.

It seems easy and if you want to read funny people on the internet slagging off the Byzantine process check out the comments under this tutorial:
https://www.youtube.com/watch?v=qGoCF0Et_CU&feature=youtu.be

I was a little lost so I started looking for the help of my peers and of course from Unity.

I found a post from one poor soul who was in the same boat as me and the response from Unity Support was: “What do you want to be supported from Unity side? I see this unrelated to our build process.” So someone needs to have a little talk to that chap.

There are more than a few forum posts around this for Unity (and that last one is for andromo but the subject is the same issue).
https://answers.unity.com/questions/1434637/can-google-play-app-signing-be-used-with-unity-and.html
https://forum.unity.com/threads/android-signing.62137/
https://answers.unity.com/questions/1372982/how-i-can-sign-my-apk-with-an-google-plays-upload.html
https://stackoverflow.com/questions/50608172/unity-google-play-app-signing-issue-and-keystore
https://forums.andromo.com/discussion/1980/important-do-not-opt-in-to-google-play-app-signing

Look – and this is really the bottom line – it all got too frustrating and annoying trying to work out what the hell was going on and since I was only in my third release cycle I just opened up a new App on the Play Store and ditched the old one.  But that’s just not possible for anyone who has an App out there and has no other option. So this is the process to getting that pesky key back.

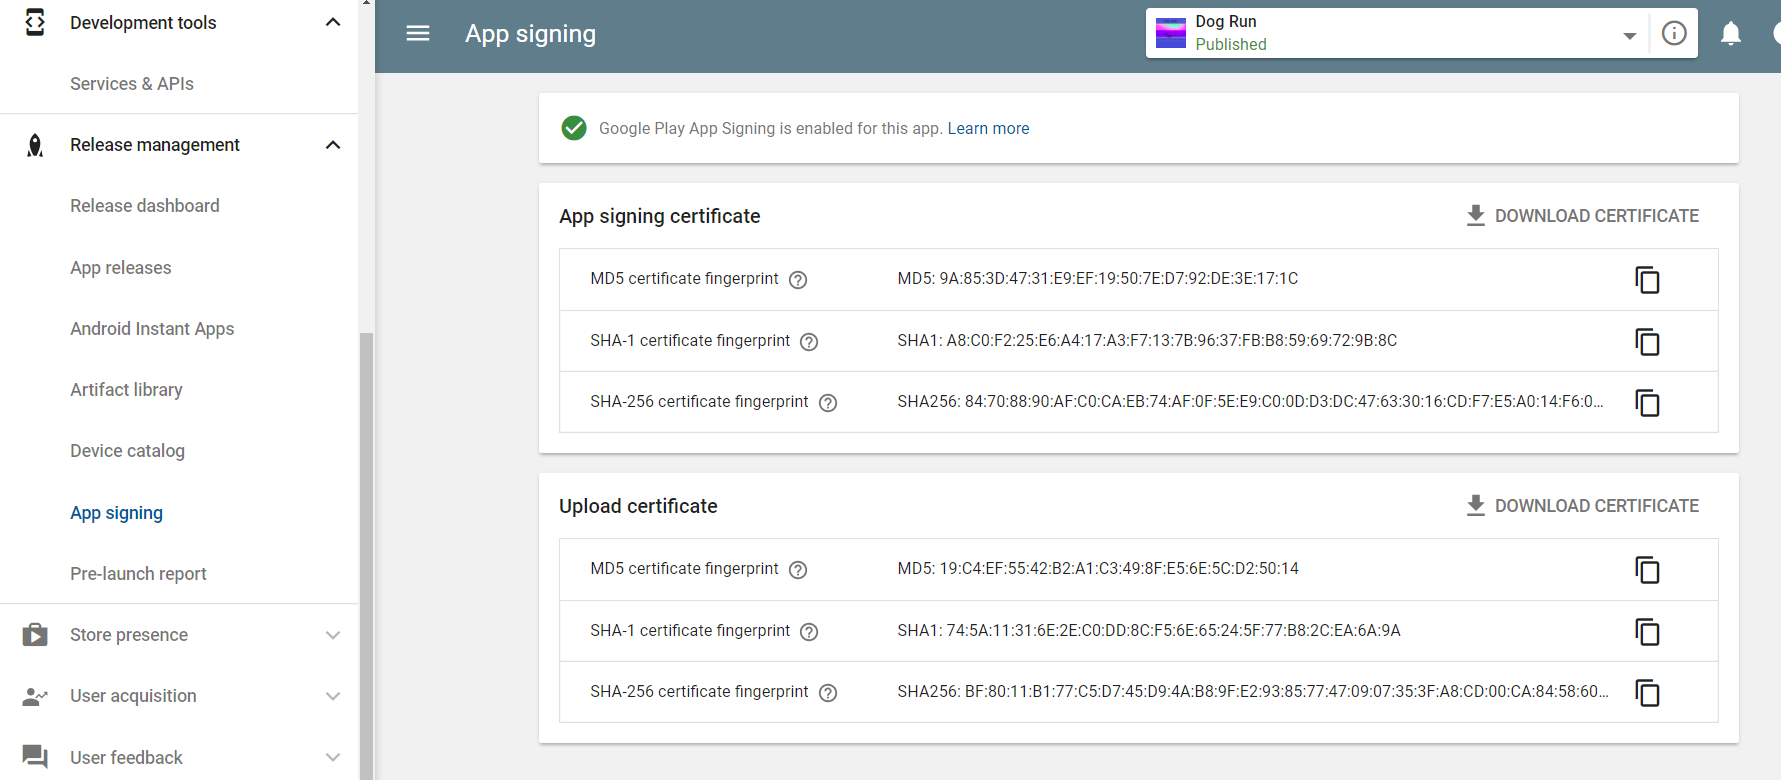
In the Google Play Store you can see your App Signing Keys here:

You got your App signing certificate – this is the one that actually signs your app.
SHA-1 certificate fingerprint (above)
SHA1: A8:C0:F2:25:E6:A4:17:A3:F7:13:7B:96:37:FB:B8:59:69:72:9B:8C

And your Upload certificate – this is the one that you use to upload with your APK so that Google knows it’s you.

Your upload key is only registered with Google and is used to authenticate the identity of the app creator.
Your upload key is removed from any uploaded APKs before being sent to users.

SHA-1 certificate fingerprint (above)
SHA1: 74:5A:11:31:6E:2E:C0:DD:8C:F5:6E:65:24:5F:77:B8:2C:EA:6A:9A

In my case the upload certificate was from the default android debug keystore (that I shouldn’t have used):

C:\Program Files\Java\jdk1.8.0_111\bin>keytool.exe -list -keystore C:\Users\<user>\.android\debug.keystore
Enter keystore password:

Keystore type: JKS
Keystore provider: SUN

Your keystore contains 1 entry

androiddebugkey, 10/08/2016, PrivateKeyEntry,
Certificate fingerprint (SHA1): 74:5A:11:31:6E:2E:C0:DD:8C:F5:6E:65:24:5F:77:B8:2C:EA:6A:9A


To generate and register a new upload key, follow the instructions in the Android Studio Help Center.
https://developer.android.com/studio/publish/app-signing#generate-key

You don’t need to use Android Studio you can also do it on the command line (which is easier I think).

First generate a private key using keytool. For example:

# keytool -genkey -v -keystore my-release-key.jks -keyalg RSA -keysize 2048 -validity 10000 -alias my-alias

C:\Program Files\Java\jdk1.8.0_111\bin>keytool -genkey -v -keystore D:\ZuluOneZero\Demo-Unity-Android-key.jks -keyalg RSA -keysize 2048 -validity 10000 -alias Demo4Unity
Enter keystore password:
Re-enter new password:

What is your first and last name?
[Zulu]: ZuluOneZero
What is the name of your organizational unit?
[Unknown]: TheDogRun
What is the name of your organization?
[Unknown]: ZuluOneZero
What is the name of your City or Locality?
[Unknown]: Melbourne
What is the name of your State or Province?
[Unknown]: Victoria
What is the two-letter country code for this unit?
[Unknown]: AU
Is CN=ZuluOneZero, OU=TheDogRun, O=ZuluOneZero, L=Melbourne, ST=Victoria, C=AU correct?
[no]: yes

Generating 2,048 bit RSA key pair and self-signed certificate (SHA256withRSA) with a validity of 10,000 days
for: CN=ZuluOneZero, OU=TheDogRun, O=ZuluOneZero, L=Melbourne, ST=Victoria, C=AU
Enter key password for <Demo4Unity>
(RETURN if same as keystore password):
Re-enter new password:
[Storing D:\ZuluOneZero\Demo-Unity-Android-key.jks]

Note: keytool is located in the bin/ directory in your JDK. To locate your JDK from Android Studio, select File > Project Structure, and then click SDK Location and you will see the JDK location
C:\Program Files\Java\jdk1.8.0_111\bin\keytool.exe
(I used this one but you will have a keytool for every JDK and JRE on your machine – doesn’t matter which one you use)

Then, export the certificate for the new key to PEM format:

# keytool -export -rfc -alias <upload> -file <upload_certificate.pem> -keystore <keystore.jks>

C:\Users\<user>\AppData\Local\GitHub\mingw32\bin\openssl.exe x509 -inform der -in C:\Users\<user>\Downloads\deployment_cert.der -out D:\ZuluOneZero\deployment_cert.pem

Add the certificate to the signing keystore:

keytool -export -rfc -alias Demo4Unity -file C:\Users\roderick\Downloads\upload_cert.der -keystore D:\ZuluOneZero\Demo-Unity-Android-key.jks

C:\Program Files\Java\jdk1.8.0_111\bin>keytool -export -rfc -alias Demo4Unity -file C:\Users\roderick\Downloads\upload_cert.der -keystore D:\ZuluOneZero\Demo-Unity-Android-key.jks
Enter keystore password:
Certificate stored in file <C:\Users\roderick\Downloads\upload_cert.der>

If you want to inspect the certificates (on Windows) right click and open with Crypto Shell Extensions.

Or you can inspect the certificates like this:

C:\Program Files\Java\jdk1.8.0_111\bin>keytool.exe -printcert -file C:\Users\<user>\Downloads\upload_cert.der
Owner: CN=ZuluOneZero, OU=TheDogRun, O=ZuluOneZero, L=Melbourne, ST=Victoria, C=AU
Issuer: CN=ZuluOneZero, OU=TheDogRun, O=ZuluOneZero, L=Melbourne, ST=Victoria, C=AU
Serial number: 3e64dcd1
Valid from: Thu Sep 13 16:28:59 AEST 2018 until: Mon Jan 29 17:28:59 AEDT 2046
Certificate fingerprints:
MD5: F8:D3:CF:84:88:8E:16:EA:3D:74:F0:7E:9E:18:13:C9
SHA1: BD:1B:A2:99:05:11:0E:F6:A0:B5:1A:7B:7D:EB:01:3C:8B:A7:98:6D
SHA256: 7C:24:86:CD:58:1A:2F:74:21:B0:A6:9B:3D:DF:BC:BE:2A:15:F3:23:B9:44:7F:98:5D:8D:FB:24:98:37:82:9C
Signature algorithm name: SHA256withRSA
Version: 3

Extensions:

#1: ObjectId: 2.5.29.14 Criticality=false
SubjectKeyIdentifier [
KeyIdentifier [
0000: 21 44 48 FA 63 97 2D B0 A4 92 2B 38 41 E4 2F 7D !DH.c.-…+8A./.
0010: EA 26 E0 10 .&..
]
]

You can inspect keystores like this:

C:\Program Files\Java\jdk1.8.0_111\bin>keytool.exe -list -keystore D:\ZuluOneZero\Demo-Unity-Android-key.jks
Enter keystore password:

Keystore type: JKS
Keystore provider: SUN

Your keystore contains 1 entry

demo4unity, 13/09/2018, PrivateKeyEntry,
Certificate fingerprint (SHA1): BD:1B:A2:99:05:11:0E:F6:A0:B5:1A:7B:7D:EB:01:3C:8B:A7:98:6D


All the detail above are dummy one’s for demonstration purposes only.

Endless Elevator Mechanics

Howdy. Xander here…

This is a quick demo of the basic play mechanics from our new game in development Endless Elevator.  We got the basic movement working a while ago (see our Smooth Moves post) and now that The Dog Run is in BetaTesting we can spend some more time working on this game.

(If you want to help with Beta Testing and be an early adopter of The Dog Run you can sign up here: https://play.google.com/apps/testing/com.ZuluOneZero.TheDogRun)

This clip below for Endless Elevator shows:

The Good Guy Cop Character movement (oh yeah he goes left and right)

Firing his awesomely powerful dumb dumb gun

Using (the eponymous) Elevator (see if you can spot the camera tracking bug!)

Traversing (the namesake) Escalators

Finally entering a doorway with a Power Cube (I’m not sure what it will look like in the final game yet). When he goes into a doorway with the special block the game flips and he goes into a Super Spy Store (not shown) where new fun weapons and power-ups are available!  Cool.

Do NOT Restart Unity After a Crash!

It all started when my laptop went into sleep mode.
I was doing some play testing of my Dog Run game and had to take a work call.
I know I know “real” work getting in the way of my real life.

Something happened and the laptop stopped responding. Wouldn’t come out of sleep mode and had to be restarted.

Now normally Unity is pretty stable. I actually can’t remember any time when it caused a crash or stopped responding or has died on me but I guess being in run mode while the laptop was asleep may have been a contributing factor.

When I restarted my machine and opened my Game again in Unity the editor barfed and gave me an error in the console like:

GetPathNameExtension(path) == “unity”
Unknown error occurred while loading ‘/Scenes/MainScene.unity’.

Then it asked if I would like to open the default scene which I promptly took to be My default scene. But sadly it wasn’t. It was the Unity default scene that you see when you open up a new project.

All of my assets and settings were gone. All those hours of tweaking objects’ positions and rotations getting things just right were wiped off the board like an angry chess master.
Poo.


This is the big lesson of today.

If the Unity Editor or your operating system crashes do NOT start Unity again without making a backup!

I know there are a few other lessons here like: 1. Always backup your project, and 2. Use source control, and 3. Backup your project again, and 4. Save your project regularly during your workflow and 5. Save the scene and the project BEFORE hitting Play when you are testing your game.

But I want to say it again because opening your project up after a crash in Unity is a really easy thing to do and seems like the right thing to do and is normal and natural and good. But it’s NOT!

DO NOT OPEN UNITY AFTER A CRASH!

Not without first backing up your project folders.

Now I know backup is a whole subject in itself and I’m going to make an entry on that soon but there are some simple ways to save the day here.

When you hit the Play button in Unity the scene and all the running elements are saved in the project’s Temp directory.

If you have a crash and want to restore your scene file, you cannot re-launch the Unity Editor after the crash.
If you do it will blow away the Temp directory and you will lose the last saved scene and all your progress with it!

Inside your Project directory folder there should be a Temp/__Backupscenes directory. If you are lucky in here you will find a file called either 0.backup or “__EditModeScene” (depending on Unity version) which is your saved scene file.

First! Make a backup of your Project directory. Take the whole thing. Easiest quickest way is to copy the whole project folder to another directory.

Then all you have to do is to copy this file back into you project and replace the broken scene file with the copy. Set the file extension to .unity in order to make this file recognizable as Unity scene file.

Please backup your project folder before making the change.

When you Run Unity and open the Scene you just moved from the Temp folder hopefully all or at least most, of your changes are there and the scene is restored.

So Unity is saving your scene every time when you hit the play button, but not over the original scene file, instead it is saved in the project’s Temp directory.

But be careful. You cannot start the Unity editor after the crash. This is by nature a Temp directory whose content is created dynamically when working in Unity.
If you restart you will lose the scene file and all the progress with it.

Once you have done this start using a new workflow.
Take regular backups.
Use source control.
Hit Save regularly while working in Unity.
Hit Save before you hit Play when testing in Unity.

Inspiration

I was getting rather upset with myself for not finishing my game yet. I had spent a lot of time learning how to get the animation of the dog into a state that wasn’t completely crap but … that a game does not make. I couldn’t visualize what the game was about anymore and I couldn’t actually see the point of continuing. It seems sometimes that it’s easier to cut your losses and just give up when a project is not coming together and weeks have turned into months .

I used to spend a lot of time doing quick two week Dev runs for a game. In those two weeks I’d get a good feel for the game and by the end of it I’d know if it was going to be viable. I spend a lot of time planning and doing design docs and color charts and programming core functionality. It’s quick fun and satisfying but it’s not an end product and I probably wouldn’t even show most of those games to close friends.  But that’s what they are about, learning quickly if your idea is going to work or not.

So this game was about taking an idea from start to finish. Making everything as good as I could. Spending time getting drawings right. It’s much harder and takes much longer than you think. And those weeks where not much happens really impact on the sense of progress and achievement. Its easy to slowly get disillusioned.

You might want to give up and start hacking for fun again. You might get stressed that time spent doing all this work for nothing was going to have you end up in the poor house (auto-corrected from poo house – which is a real place too). You might suspect that you have extended your childhood too far into responsible adult life and that you are a talentless man-child who will never do anything. Ermmm.

I know some get feelings like this more than others and I’m truly sorry for their pain in life. In truth I’m probably living in a fantasy world but its one of my own making and to fuel it I need inspiration. The desire to make games stems from a belief that if you do what you enjoy then you will be good at it and successful. Also I think the gamefication of life makes it better and more enjoyable.

Simple things like watching the Mrs trying to catch grapes in her mouth for the first time and Everything my son does. At nine everything he does is a game. He never walks to his room if he can jump pillows down the hall (lava!).

Games can be addictive. God knows I’ve had to strip even Tetris and Minesweeper from old computers just to get some “real” work done. So I have a vague feeling of guilt when I play games instead of making them or doing something else productive.

The point is there are good reasons to make games, and better reasons to try and make great one’s. So that’s what happened. I played a game I was using as a reference and benchmark for my own and quite simply it inspired me. So now let’s get back to making games.